
Prerequisites
- Recorder or camera CGI Authority is set to basic authentication
- All devices are connected to the same network
- See figure 2 for KB-300 menu tree
- Factory Defaulting the KB-300
KB-300 System Settings
- Log into the KB-300 by pressing the Enter button. The default credentials are admin:888888
Note: For KB300-V2 models, you will need to set a password when first deploying the device. Input an 8-character, alphanumeric password under the Password field and input the same password under the OK field. See figure 1
- Use the joystick to hover over Menu Settings and press Enter
- Enter the System menu then select Time and press Enter. Then, manually input the local time. You can twist the joystick or use the zoom options to increase/decrease values
- Press Enter to return to the previous menu and save the changes
- Enter the NTP menu
- All the values except Zone can be left default. Change the Zone field to match your time zone and press Enter when done
- -05:00 EST
- -06:00 CST
- -07:00 MST
- -08:00 PST
- Optional—The KB-300 is DHCP by default. You won't have to manually set an IP address but it's possible by disabling DHCP in the Network menu.
Figure 1 - KB-300 Initialization
KB-300 Camera/NVR Set Up
- Select Menu Settings from the main menu
- Enter the Zone menu
- The ID field doesn't matter; you can choose whatever number you want. Each device being added needs to have a unique ID.
- The device Name can be anything so long as it's 8 characters or less. Press the shift key to cycle between numbers, lowercase letters, uppercase letters, and symbols. The focus +/- options will allow you to delete.
- The Type field will depend on whether you're adding a PTZ camera or adding a video recorder. If you're adding a PTZ camera, select SD. If you're adding an NVR, select NVR.
- Scroll down by using the joystick until you see the IPAddr prompt
- Input the IP address of the NVR or camera
- Input the TCP port. IC Realtime cameras are typically on 37777 by default. Modern recorders are on 32789. Legacy recorders may also use 37777. You can confirm the port by checking within the network menu of the NVR/Camera
- Scroll down until you reach the PW field and input the password of the NVR or camera.
- Pressing Enter will save the configuration successfully so long as you've enabled basic authentication.
Confirm Connection
- Select Zone Control from the main menu
- Twist the joystick or use the W/T zoom buttons to select the ID you configured in the previous step 3
- Press Enter and the KB-300 should log into the device.
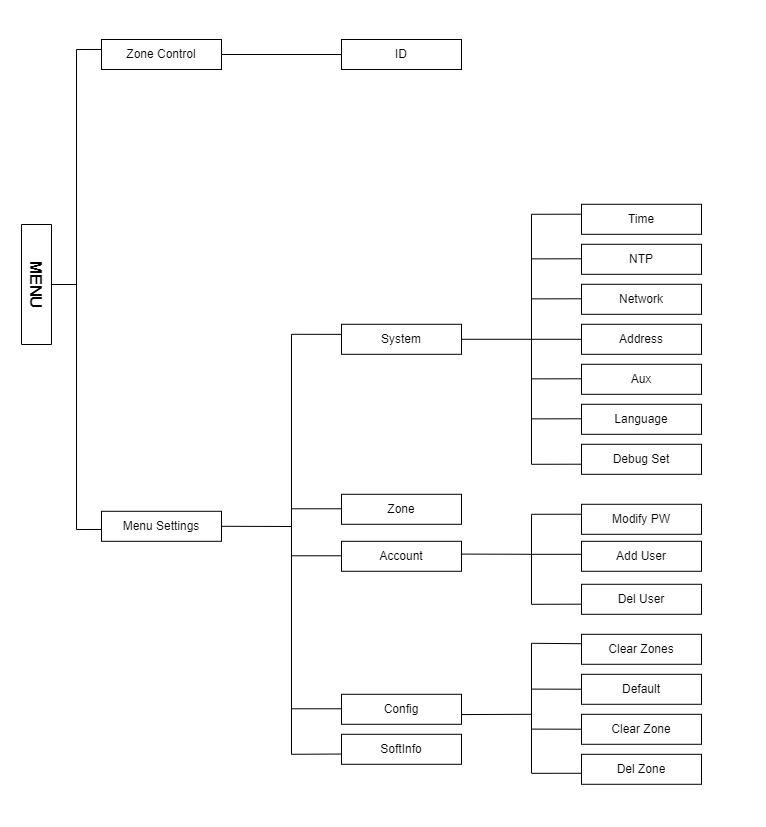
Figure 2 - KB-300 Menu
Factory Defaulting the KB-300
To Factory Default the KB-300, Press and hold 【ESC】 for 15 seconds to restore keyboard configuration to factory default setup.
This will be presented after a factory default:
-
USER: admin- the user account to use for the keyboard. Preferred connection method -
PW:- Enter the password you wish to use, preferably the devices admin account password -
OK:- Confirm your password and enter it again
Comments
0 comments
Please sign in to leave a comment.